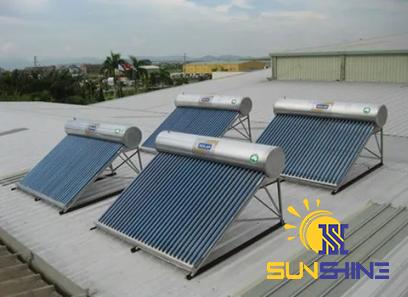
Would you pay for a solar water heater if you knew how to make a solar water heater from some cheap material? Soda cans, for example.It may seem weird but it’s possible to make this heating system using garbage like soda cans or water bottles
solar water heater uk
Components Required to Construct a Soda Can Heater Here are the essential components Regardless of the size of the system or the number of panels, the parts list and the necessary tools will remain relatively the same You may need to alter some components based on their availability and your design preferences For instance, you may wish to substitute automobile exhaust pipes for soda or food cans, or other materials Cans of Soda – The quantity of soda cans required depends on the size of the solar water heater panel You must utilize aluminum cans, as opposed to plastic or other materials It is also a good idea to maintain uniform can sizes Front glass – If you are constructing a small solar water heater unit, you may use a window with two panes Alternately, you may use Plexiglas, polycarbonate, or tempered glass for this and bigger heaters Depending on the material, extra bracing may be required to limit the danger of breaking Wood, Insulation, and Other Construction Materials — Use 1/4″ thick plywood for the rear of the solar water heater panel enclosure To insulate the rear of the solar water heater collector, use rock wool or styrodur (fireproof insulation board) with a thickness of 0 8 inches Fireproof insulating foam Metallic duct tape for the ultimate seal Flat, high-temperature enamel black spray paint was used to paint the exterior of the soda cans and the interior of the solar water heater panel box The silicone glue is resistant to temperatures of 400 degrees or higher 8 – 1×6 boards per unit for the construction of solar water heater panels and upper and lower collector housings 5″ vents for bottom intake vents Utilize numerous units so that you may manage airflow by turning off one or more as necessary 3″ ventilation for the top exit 
solar water heater price
Additionally, numerous units can be utilized to regulate airflow Screening material for the outside intake(s) to prevent insects and other airborne debris from entering the intake vents The appropriate screws and nails for a building job Size-appropriate thermostat for the solar water heater system Needed Tools Gloves are designed to guard against very sharp aluminum shavings and glass shards If you will be utilizing power tools, you should wear goggles and earplugs Suitable screwdrivers or electric screwdrivers A drill powered by a 2 5/8″ bore hole bit and bit set Circular saw hand saw or jigsaw for cutting wood or metal A metal punch is used to punch holes in cans snips for cutting soda cans The tools include a hammer, pliers, clamps, a square, a measuring tape, and pencils Use a vice or other device that does not need the use of your hands to secure the can while you cut it Cleaning and preparing the soft drink containers Once you have collected enough cans for your project, you will need to properly remove any liquid from them and allow them to dry Additionally, the cans must be devoid of dents, rips, and cracks Next, sand the cans to remove the exterior labeling and create a rough surface that will allow the black high-temperature paint to attach to the metal surface with more ease Cutting the Can for System Integration Begin by cutting an uneven shape in the can’s bottom center You can employ a star-shaped obstruction or anything else that disrupts airflow The objective is to ensure that the air traveling through the cans is forced against the sidewalls, where it will heat up before the system is completely exhausted Next, remove the can’s pop-top Using tin snips to cut into the top of the opened pop top is the simplest method to achieve this Make a star shape toward the outside edge, and then insert the metal tabs into the can with care Do not cut below the thicker metal on the bottom of the beverage can You will need the indentation to support the subsequent can that will be stacked on top The bottom end of each can should fit into the top end of the can below it 
solar water heater price in nepal
The Gluing And Sealing Of The Cans Now that the cans are prepared for installation in the system, it is time to seal them using silicone high-temperature glue To begin constructing the soda can tube, position the first can so that its bottom is facing up Apply glue entirely around the rim of the second can’s base Now, position the bottom of the second can so that it rests on the top of the can underneath it Between the two cans, there should be no air leaks or holes in the sealant Continue in this manner until the metal tube’s length corresponds to that of the solar water heater panel As you continue to glue cans together, they may begin to lean and form curves As you work, arrange the cans between two “L”-shaped boards so that they remain upright Once the column of cans has dried, the form can be removed About 24 hours are required for the glue to cure Air Intake and Exhaust Junction Box Construction Before beginning construction on the box, ensure that every piece of wood has been coated with the same black paint used for the cans To create the top and bottom of the intake and exhaust connection boxes, you must drill holes in the top and bottom boards to allow air to flow between the can columns 
solar water heater 100 ltr price
You can place individual cans along the board, allowing 1 1/2 inches between each one This will aid in preventing the board from cracking or becoming too fragile between the cans Draw a circle around each can to determine where to drill the air holes for each column of cans Use a 2 5/8-inch drill bit to bore the holes If you find that the space between the can holes is too thin, you can reinforce it using aluminum tape After completing the lower manifold, you may use it as a template for the upper manifold Once the manifolds are finished, you must construct the can housing box and attach the manifolds to it To do this, take the rear panel and add two sides along the panel’s length, then attach just the top manifold Make certain the top manifold is approximately 6 to 8 inches from the top of the box Attach the top of the box once the top manifold has been installed Don’t forget to arrange the manifold pattern from left to right so that the can columns remain aligned and straight within the panel Apply 0 8-inch-thick styrodur or rock wool to the interior of the heater’s rear panel, then paint it flat black and allow it to cure Pay close attention to the insulation surrounding the air intake and outlet of the solar water heater collector to plug any air leaks that may arise These leaks can damage an otherwise functional system Start the installation of the cans on the left side of the panel Insert the top can of the column into the upper-left hole of the manifold 
solar water heater panels swimming pool
Repeat this procedure throughout the entirety of the upper manifold Place the bottom manifold with caution While working, line the bottom of each column of cans so that it fits into the corresponding hole Use silicone adhesive to adhere the top and bottom cans together Continue doing so until all rows of cans are firmly affixed with adhesive Now return and connect the bottom manifold to the panel and sides with care Again, you must provide 6 to 8 inches from the bottom for the air entry region After the lower manifold has been placed, proceed to install the lower frame Installing the System Most people install systems (8’x4′ or bigger) on the outer wall of the building, with air intake and output ducts cut through the exterior wall and into the heated area The output manifold, which is placed at the top of the solar water heater, will direct warm air into the building The intake air transports cold air via the bottom-mounted intake manifold of the solar water heater Mount the box temporarily to the exterior wall Notate the locations of the air inlets and outlets, as well as the permanent mounting hardware, to avoid making a mistake during drilling Both the intake and outflow holes should be drilled through the wall Use silicon with a high melting point to prevent air leaks around the solar water heater collector’s intake and output Install mounting hooks at each corner of the solar water heater collector, allowing it to be mounted to the wall For an extra variant, you may choose to include a hinge system and additional supports so that the panel’s tilt may be adjusted for seasonal use After installing the solar water heater, you may cover the can core and frame with glass or another transparent material of your choosing Do not forget to caulk the covering so that as much heat as possible remains within the system Install a fan at the bottom intake and power it using a technique of your choosing to complete the system 
solar water heater panels cost
Regulates for the thermostat — For big solar water heater heating systems, utilize a differential thermostat that controls the fan The majority of electrical component retailers carry these This thermostat features two sensors The first sensor is situated within the aperture for hot air The second sensor is located within the cold air intake When both of these sensors are functioning properly, you may increase outlets to receive as much heat as possible throughout heat-generating and non-generating hours Install dampeners to close the system’s intakes and outputs while they are not in use to minimize heat loss throughout the night These controls should be situated within the heated chamber Test the solar water heater heating system for air, heat, dust, and moisture leaks following installation Constructing A Portable Solar water heater The construction technique for a portable solar water heater is quite similar to that of a bigger system In this instance, though, framing concerns will vary Once the size of the internal solar water heater furnace core is determined, the same procedure may be applied Here are some options you may wish to consider: Construct this system as an A-frame This will make it simpler to construct an angle-adjustable panel or perhaps a succession of panels that create a curve around the frame Additionally, wheels may be added so that the complete array can be moved from one location to another Utilize circular inlets and flexible pipes to effortlessly pipe air into any desired space or location 
Your comment submitted.